Editing Landscape Data in IFTDSS with User Created Edit Rules
LANDFIRE landscape data are designed to be a course scale satellite-derived national dataset. Due to recent disturbance mechanisms such as fire, windthrow, beetle, drought and disease outbreak, as well as management activities, LANDFIRE data may not reflect well the actual fuel conditions in your project area. Consequently, LANDFIRE data may need to be edited to better reflect the local conditions within your project area, principally to reflect anticipated fire behavior. Additionally, as fuel treatments are simulated LANDFIRE data will need to be edited to reflect post-treatment conditions. Editing a LANDFIRE dataset is much easier and faster than developing a landscape data file from scratch.
This tutorial will walk through the process of editing landscape data created in IFTDSS with User Created Edit Rules. It assumes you are already familiar with generating a landscape in IFTDSS. If needed, you may take a few minutes to become familiar with that process by visiting the short landscape creation tutorial.
Part One of the tutorial will walk through a basic edit to familiarize you with the editing interface. Part Two of this tutorial will walk through a more complex edit in a way that allows you to generate a summary report of the editing changes.
Tip: A note on naming landscapes: It is best practice to keep your landscape name to 30 characters or less, as some tasks in IFTDSS will create default output names that can become quite long. It is also wise to include details in you landscape name to help describe what the landscape is or how it is edited. For example, ending a landscape created from LANDFIRE 2014 data with "LF14" to indicate its origin.
Editing Landscapes Part One
Before beginning editing, you will generate a landscape. Go to the IFTDSS Planning Cycle, Landscape Evaluation stage, and the Landscape Summary task. Use the Create landscape button to create the landscape we'll use in the example using the information below:
-
Landscape Coordinates:
- North: 40.1025
- West: -112.8500
- East: -112.8000
- South: 40.0700
- LANDFIRE version: Landfire 2014
- Fire behavior model: Fuel Model 40
- Landscape Name: "Grassy Valley LF14"
- Folder: create a folder named "Landscape Editing"
This will create a small (~3,000 acre) landscape in northwest Utah dominated by a Low Load, Dry Climate Grass fuel model. Take a moment to complete the summary process by clicking the Request a Report button and examining the PDF summary report that is generated.

You're going to make a simple edit to simulate a prolonged drought. You’re going to change the GR2 (low load, dry climate grass) to a GR1, which is a short, sparse, dry climate grass.
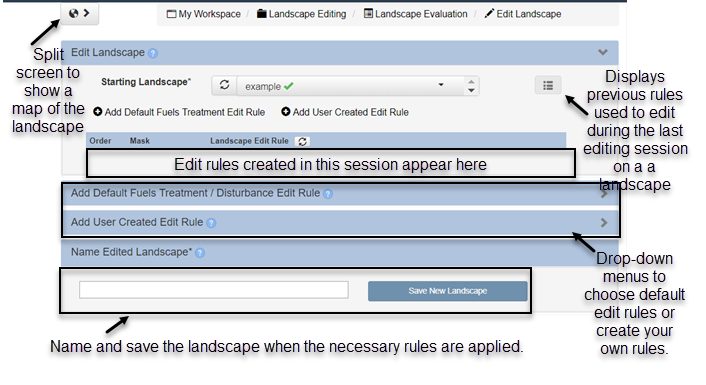
To begin editing a landscape, you may either find the landscape file in My Workspace and click Edit, or use the Planning Cycle, and navigate to Landscape Evaluation and then Edit Landscape. The editing interface is identical regardless of the method you choose.

Take a moment to become familiar with the editing interface.
Now, select the landscape you just created and begin editing. From the Editing Interface:
-
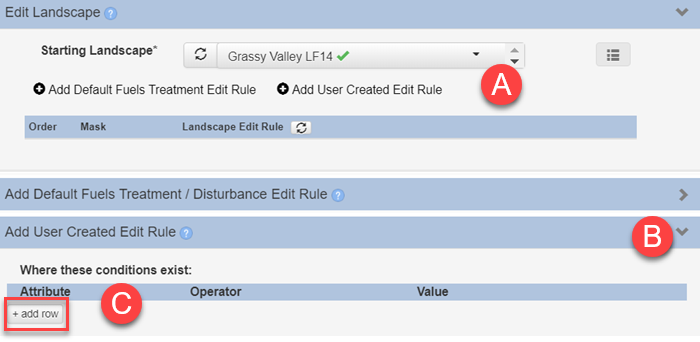
Select the "Grassy Valley LF14" landscape. When this landscape is edited, a new, edited version of the landscape will be created. The end result will be two landscapes: your original unedited landscape, and your newly edited landscape.
-
Expand the Add User Created Rule heading.
-
Click Add Row to start setting the conditions to which the rule will apply.
-
Use the drop-down fields to specify a rule that will apply where: Fuel Model is equal to 102(GR2) exists.

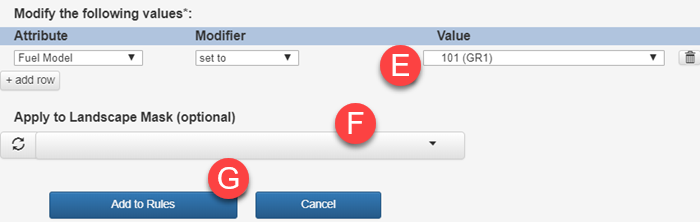
- In the fields under Modify the following values click the add row button and add use the drop-down fields to specify the change that will occur when then criteria are met: Fuel Model set to 101(GR1).
- You will notice an option to constrain the edits to a mask. If you had a shape or shapefile that the edits would be limited to, it could be selected here. In this example it will be left blank, which will be applied to the entire landscape.
-
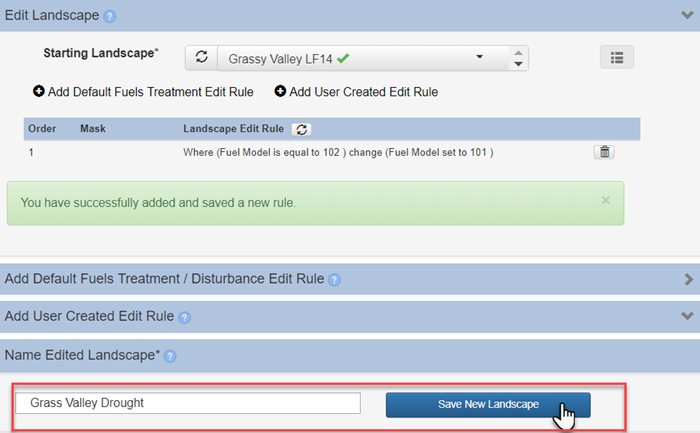
When finished creating the rule, click Add to Rules. Note that your new rule will be listed toward the top of the page, between your landscape name and the editing fields. If you wanted to apply additional rules that could be done here before naming and generating the newly edited landscape. Take a look at the Rule Ordering Topic, which details the order in which multiple editing rules are applied.
-
To apply the rule and create the edited landscape, give your landscape a descriptive name, in this case "Grass Valley Drought", and click Save New Landscape.
Your original landscape, as well as the newly edited landscape are now available in My Workspace. Selecting the new landscape and clicking View on Map, will display the new landscape in Map Studio. Using Identify, you can confirm that the edit has worked, all the areas that were GR2 are now GR1:

Editing Landscapes Part Two
Now that you have completed an easy edit you will practice with a more complex edit using some different methods. In this scenario you'll examine a specific area, the Cruches Basin Wilderness. You'll make edits within the wilderness area to reflect aspen stands, represented by fuel model TU1(161), that have recently experienced high mortality on dry south-facing slopes. These southerly aspect stands now have many jackstrawed dead down logs dry enough to burn.
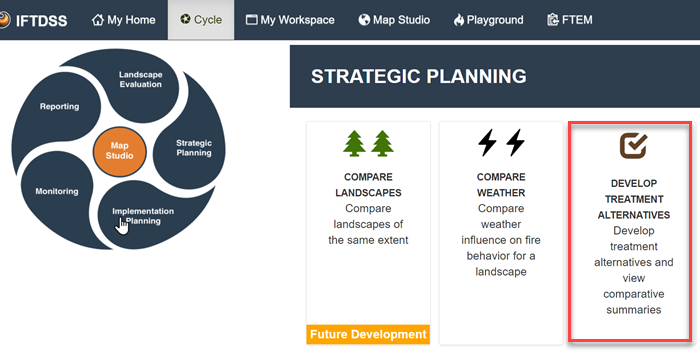
The editing will take place within the Develop Treatment Alternatives (DTA) task. In this case you are not creating treatment alternatives, but will take advantage of DTA's comparison report feature, to generate and view a summary of the fuel changes that result from the edits. If you would like a full tutorial specifically on developing treatment alternatives, we recommend the Granite Creek DTA tutorial.
Before beginning the editing, navigate to Map Studio and use the information below to generate the landscape you'll edit:
-
Landscape Coordinates:
- North: 36.9900
- West: -106.3700
- East: -106.2500
- South: 36.8800
- LANDFIRE version: Landfire 2014
- Fire behavior model: Fuel Model 40
- Landscape Name: "Cruches Basin LF14"
- Folder: "Landscape Editing"
Create a mask for editing
View the newly created landscape in Map Studio. This landscape encompasses the Cruches Basin Wilderness area. Use the IFTDSS reference layer for that wilderness area to create a shape that you can use as a mask:
-
Open Add Layers
 , select the IFTDSS Reference Layer tab, expand the "Designated Areas" category, and select "Wilderness" to display it on the map. You will see the area appear over your landscape.
- Open the Create/Edit shapes
 widget and select the Copy from Existing Features
  button. Leave the option for Select Singlepart selected, this will only select the shape you click on. If Select Multipart were selected you would be able to capture multiple shapes associated with a feature by clicking on it once.
 -
Click the "Cruches Basin Wilderness" area to select it. In Create/Edit shapes
, name the selection "Cruches Basin Wilderness", specify the "Landscape Edit" folder to store the shape in, and click Create.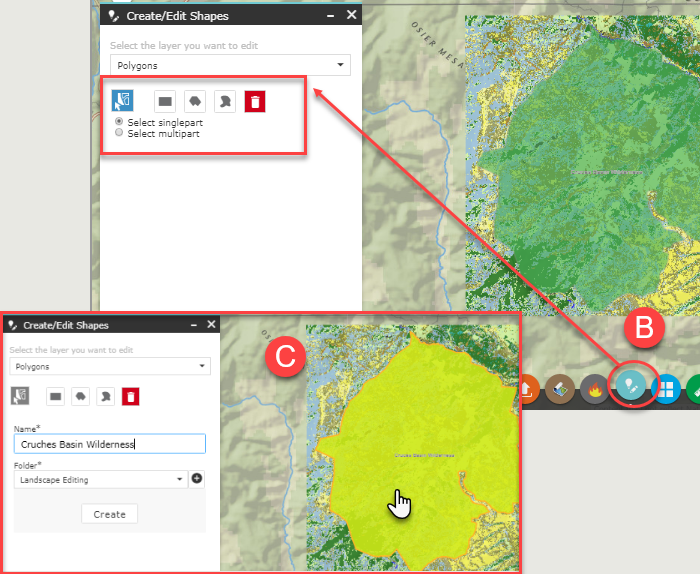
Editing the Landscape
For this edit, you are going to make edits as part of the Develop Treatment Alternatives task. This task will provide an opportunity to make edits, as well as run fire behavior across different landscapes/treatments and generate summary reports describing the difference on each landscape.
To begin, select the Develop Treatment Alternatives task from the Strategic Planning stage of the Planning Cycle.
- In the first tab, select the "Cruches Basin LF14" as the landscape.
-
In the Area of Interest field select "Cruches Basin Wilderness." This will constrain comparison reports, which you will generate later, to that area of interest. If left blank the reports would be generated for the entire landscape. To split the screen and display a map of the area on the left, you may use the split screen
 button to the right of the Select Landscape field.
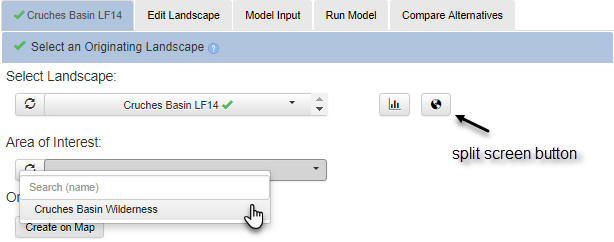
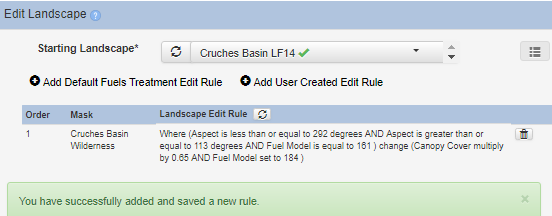
- Proceed to the Edit Landscape tab. You will notice this is the exact same editing interface as we used earlier. Because the edit will simulate a jackstrawed area on south facing slopes, you'll create a rule that will change the Fuel Model and Canopy Cover at a specific aspect.
- Expand the Add User Created Edit Rule. For existing condition, create three rows that specify:
- Where Fuel Model is equal to 161 (TU1), aspect is greater than or equal to 113, and less than or equal to 292.
- For the modification of the selected areas, add two rows and specify:
- Canopy Cover is multiplied by 0.65 and Fuel model is equal to 184 (TL4).
-
In the Apply to Landscape Mask field, use the drop-down to select "Cruches Basin Wilderness." This rule will find all TU1 areas between 113-292 apsect within the Cruches Basin Wilderness mask, and change the fuel to timber litter and reduce the canopy cover by 35%. You may consider modifying canopy bulk density as well, but this is at low value already, and we are not concerned that live aspen crowns will burn. If crown fire were a concern, then this value should be edited as well.

-
Click Add to Rules. You will see your new rule added to Landscape Edit Rule list above. You may notice the editor has changed the order of your rows, but the important thing is, does the rule language make sense?
-
Give the landscape a descriptive name, "Cruches Basin 184 cc .65" and click Save New Landscape.
At this point, your newly edited landscape will be available in My Workspace, and in drop-down menus throughout IFTDSS. You may choose to look at the landscape report for your newly edited landscape as you did in first part of this exercise to see if the edits were applied as expected. To do this, you will need to leave Develop Treatment Alternatives, go to My Workspace find and select your edited landscape, and click on it and choose Request a Report. When the report has completed, open it and scroll to fuel model. If the report is not open for the unedited landscape open it as well. If you compare the two reports, you will see your new edited landscape now has the TL4 fuels you created in the edit session. The TL4 does not make up a significant portion of the landscape but does constitute over 1,000 acres.
Return to the DTA interface via the Planning Cycle, and selecting the "Cruches Basin LF14" landscape and "Cruches Basin Wilderness" area of interest. As you progress through the tabs, your edited landscape will automatically be available.
-
Click on the Model Input tab. In this tab you will enter parameters to run a fire behavior for all edited landscapes before comparing them. For this tutorial, enter the following inputs and click Save Inputs when finished:
- Windspeed (mph): 15
- Wind Direction: 230
- Crown Fire Inputs: Leave at default values
- 1hr Fuel Moisture: 3
- 10hr Fuel Moisture: 5
- 100hr Fuel Moisture: 10
- Herb Fuel Moisture: 30
- Woody Fuel Moisture: 60

-
Click the Run Model tab. Leave the name for each landscape run as-is and click Run Model for each one. You may use the Refresh
 button next to Run Status to see when the runs have finished.
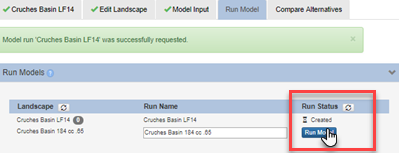
- Click on the Compare Alternatives tab. This is where comparison summaries are generated, either as map layers, or PDF reports. For this tutorial you will generate a PDF report.
- Select "Cruches Basin 184 cc .65" as your first landscape, and "Cruches Basin LF14" as your second.
-
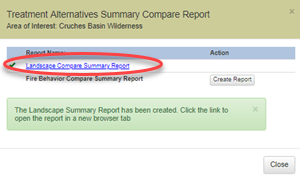
Click Compare in Summary Report. A box will appear showing report options. Click Create Report next to the Landscape Compare Summary Report option. The report may take a minute to generate. Click the Refresh
button to check the report status.
-
When the report name turns blue, indicating your report is ready, click on the report name. This will open your comparison report in a new tab.
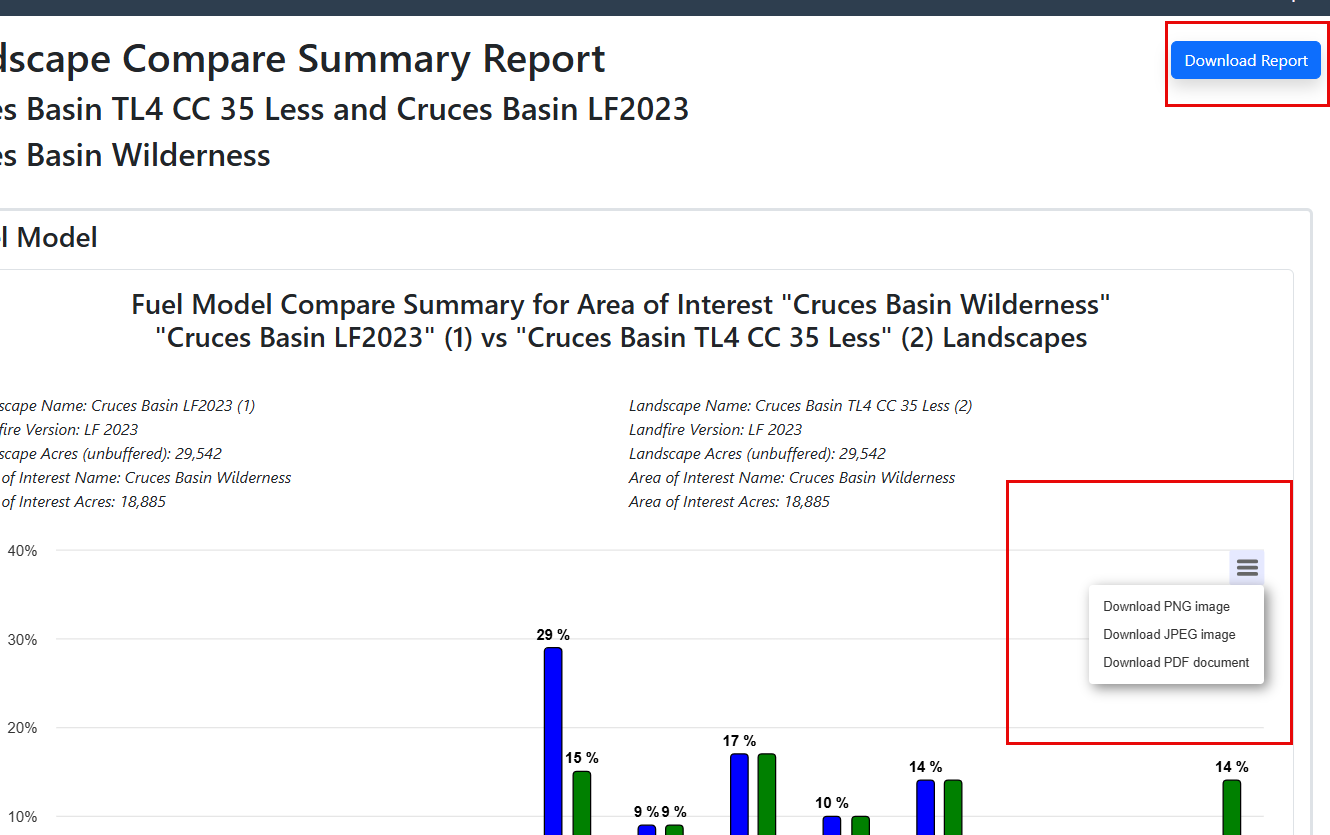
Reviewing the Landscape Compare Summary Report
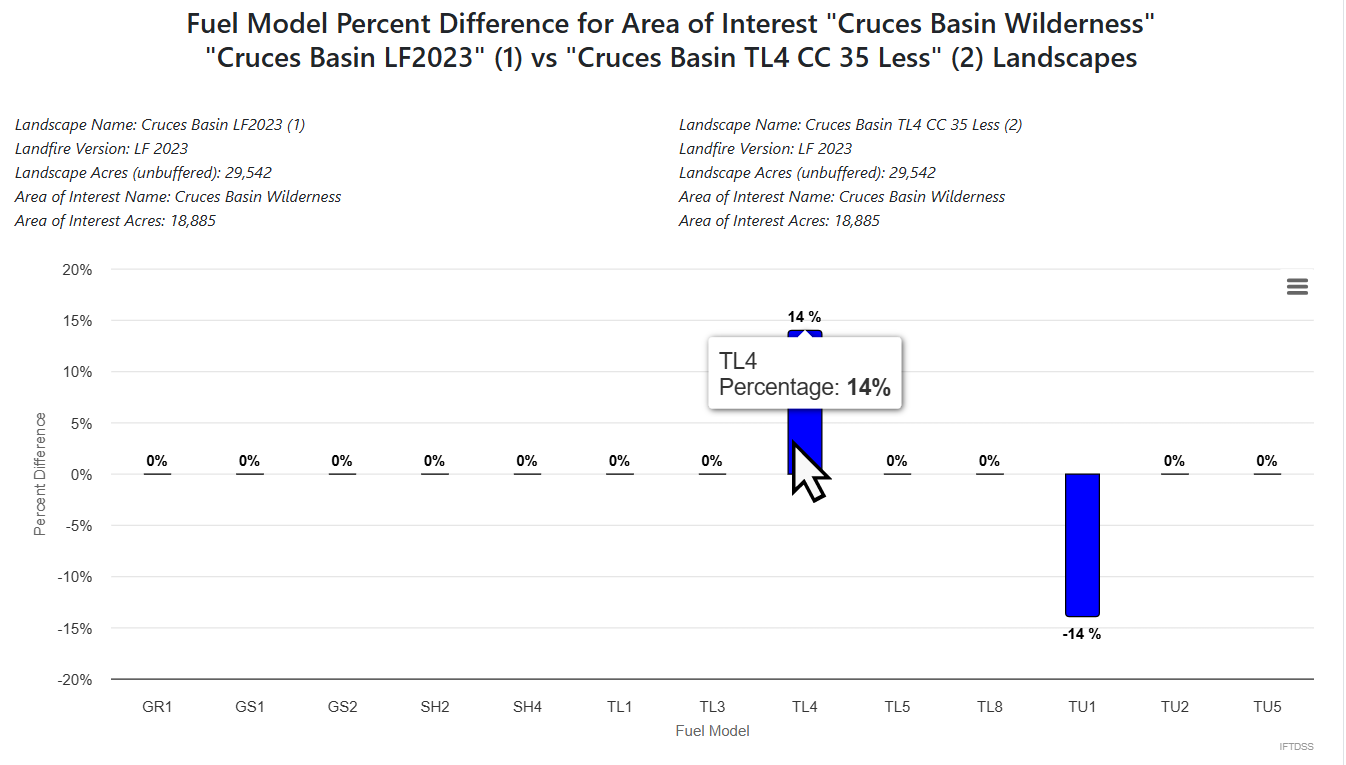
This report compares the two landscapes side by side. From the first graph, you can see fuel model TL4 is present on your edited landscape but not on the original landscape.

Scrolling down to the Percent Difference chart, you will also see that TL4 has increased by approximately 6%, and TU1 had decreased by the same. This confirms that your edits moved some of the TU1 to TL4. The other tables and charts confirm this as you scroll down further.
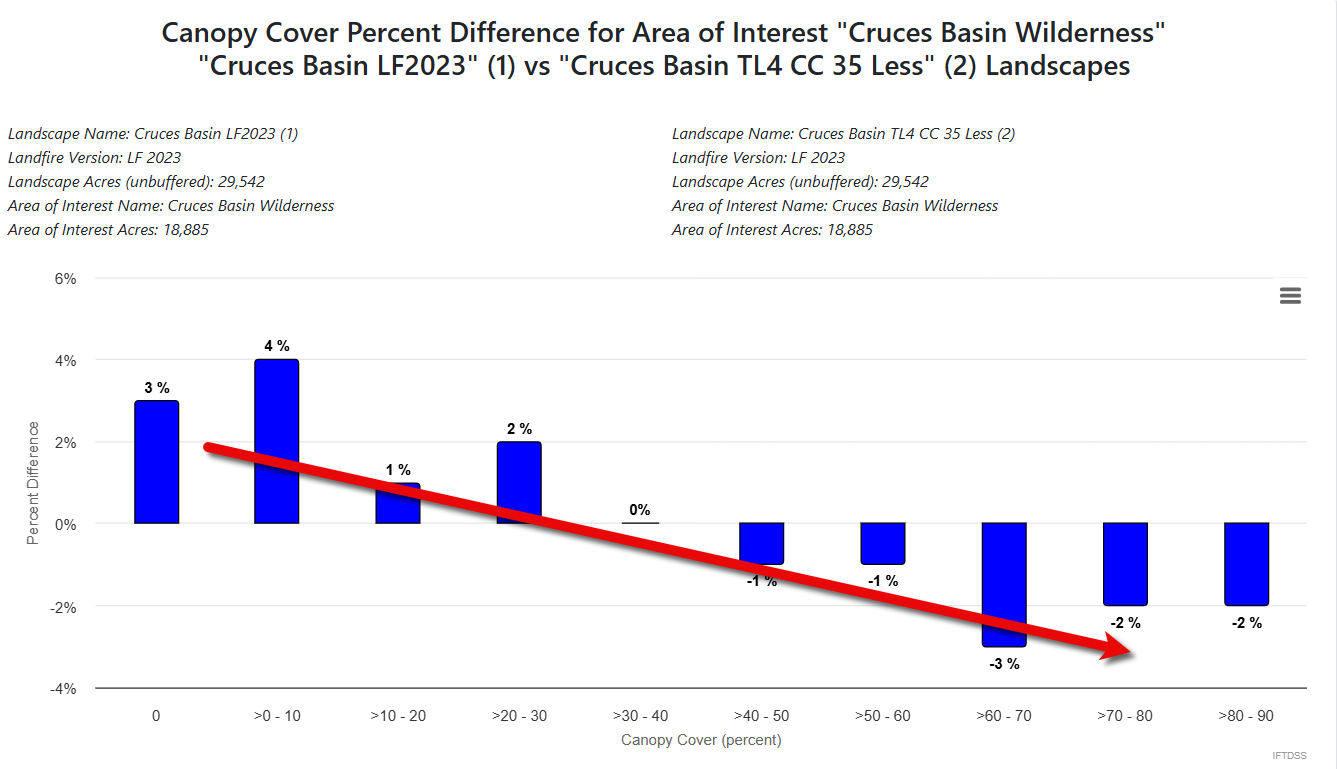
Review the charts and tables for Canopy Cover. Do these reflect the edits you made to the canopy cover?
This report is very powerful. Individual sections can be exported in various formats using the button in the top right, as shown below, and entire reports may be downloaded using the download  button in the top right of the PDF.
Additionally, data displayed in tables can be exported in CSV, Excel, or PDF format or copied for written reports or printed, and data can be exported in CSV or Excel format for further analysis or display with other graphs or tables.

Another Look
Return to the Comparison tab summary reports option. This time, generate a report for fire behavior comparison and review it.
What changes did your edit rule make to the fire behavior on the landscape? Does this make sense changing from a grass-shrub model to logs over a small portion of the landscape?
Conclusion
This concludes the User Created Edit Rules tutorial, but feel free to explore and use your new skills to try other landscape edits. IFTDSS also has default fuel treatment and disturbance based edit rules that can be used to edit your landscape. Some Help Center topics you may find useful for editing include:
- Editing Landscape Data for Landscape Evaluation - brief overview of the editing interface for Default Edit Rules as well as the User Created Edit Rules we used here.
- Rule Ordering Considerations when Editing Landscapes - Describes rule ordering behavior for Default and User Created Rules and what happens when these rules are mixed. Included Examples.
- Landscape Editing - Default Fuel Treatment and Disturbance - List of Default Edit Rules.
- Default Fuels Treatment / Disturbance Edit Rule Technical Documentation - Technical Documentation for Default Edit Rules