Create/Edit Shapes widget in Map Studio
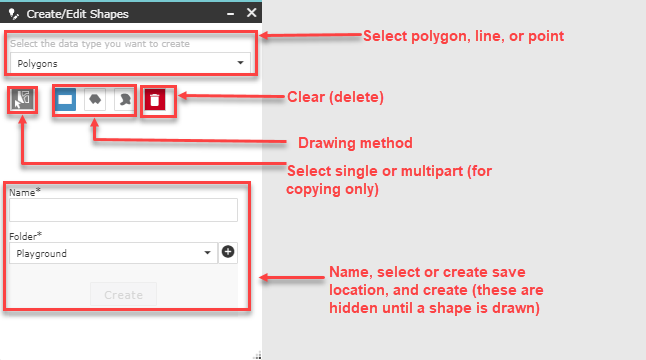
The Edit/Create Shapes widget ![]() allows you to create, edit, and save the following:
allows you to create, edit, and save the following:
Note: This tool is for creating shapes. To import existing shapefiles, use the Upload Shapefile ![]() widget.
widget.
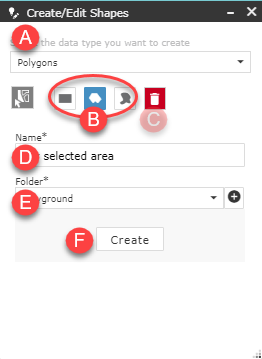
- Make sure "Polygon" is selected from the dropdown menu.
-
Select your drawing method and draw your shape.
- Drag a Rectangle: To drag a rectangular extent, click the Extent
 button. On the map hold down the left mouse button to establish the corner of your rectangle and drag until it is the required size, then release the left mouse button. Repeat if needed.
 - Snap Points: To snap a polygon using points, click the Polygon
 button. On the map single left click to create your first point. Add as many points as needed, then double left click to complete the polygon. Repeat if needed.
 - Draw Freehand: To draw a polygon freehand, click the Freehand
 button. On the map hold down the left mouse button, draw your shape, and release the left mouse button when finished. Repeat if needed.
- Drag a Rectangle: To drag a rectangular extent, click the Extent
- (Optional) Use the Clear
 button to delete your drawing and start over.
 - Name your shape.
- Select a save folder from the dropdown menu or use the Add folder
 button to create a new folder in which to save.
 -
Click Create to save the shape and add it to the map.
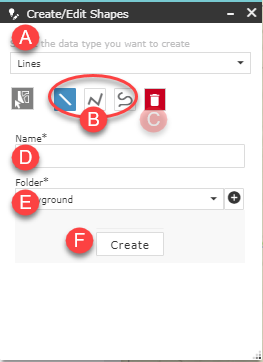
- Make sure "Lines" is selected from the dropdown menu.
-
Select your drawing method and draw your line.
- Line: To create a straight line, click the Line
 button. On the map hold down the left mouse button to establish the start of the line, and release the left mouse button to end the line. Repeat if needed.
 - Polyline: To create a polyline, click the Polyline
 button. On the map single left click to create your first point. Add as many points as needed, then double left click to complete the polyline. Repeat if needed.
 - Freehand Polyline: To draw a freehand polyline, click the Freehand Polyline
 button. On the map hold down the left mouse button, draw your line, and release the left mouse button when finished. Repeat if needed.
- Line: To create a straight line, click the Line
- (Optional) Use the Clear
 button to delete your drawing and start over.
 - Name your line(s).
- Select a save folder from the dropdown menu or use the Add folder
 button to create a new folder in which to save.
 - Click Create to save the shape and add it to the map.
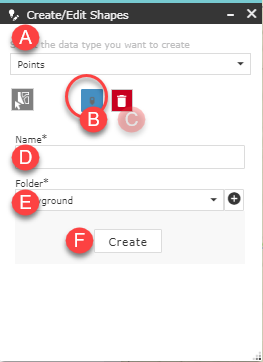
- Make sure "Point" is selected from the dropdown menu.
-
Click the Point
 button. Single left click on the map to place your point. Repeat as needed.
 - (Optional) Use the Clear
 button to delete your point(s) and start over.
 - Name your point(s).
- Select a save folder from the dropdown menu or use the Add folder
 button to create a new folder in which to save.
 - Click Create to save the shape and add it to the map.
- Make sure "Polygon" is selected from the dropdown menu.
-
Click Copy from Existing Features
 and choose the "Select singlepart" radio button if you are copying a single shape, or the "Select multipart" radio button if you are selecting a multipart shape.
 - Navigate to the shape and single click within the area to select it. If you want to edit it as well, see the copy and edit instructions below.
- Name your shape.
- Select a save folder from the dropdown menu or use the Add folder
 button to create a new folder in which to save.
 - Click Create to save the shape and add it to the map.
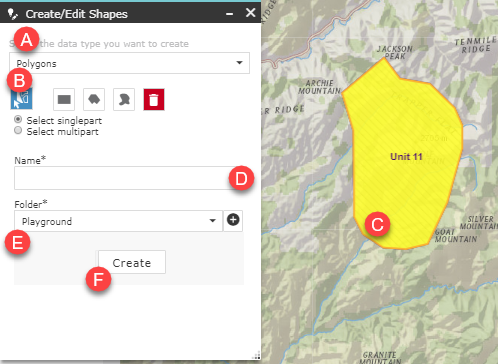
- Open Create/Edit Shapes
 from the bottom of Map Studio and click Copy from Existing Features
 . To edit only one polygon, choose Select Singlepart, or to edit multiple polygons choose Select multipart.
 -
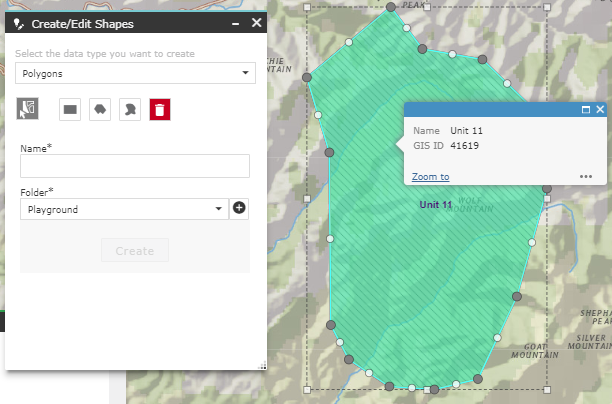
- Move a vertex by hovering over it, holding down the left mouse key, and dragging it to the correct position.
-
Delete a vertex by hovering over it, clicking the right mouse button once, and clicking Delete.

-
Continue your edits until you are satisfied with your shape.
-
Save the new shape by giving it a descriptive name in Create/Edit Shapes, specify the folder to save the file to, and click Create. The new shape will now be available in My Workspace for use throughout IFTDSS.
