Previewing and Creating a Landscape Using Map Studio
Previewing the Landscape
The first step takes place in Map Studio to get a good look at the area and create a landscape to start working from. To do this:
- Access Map Studio from the top navigation panel, visible on any page in IFTDSS.
- Use the Zoom widgets, and mouse, to locate your area. The location search box at the top of Map Studio can also be helpful.
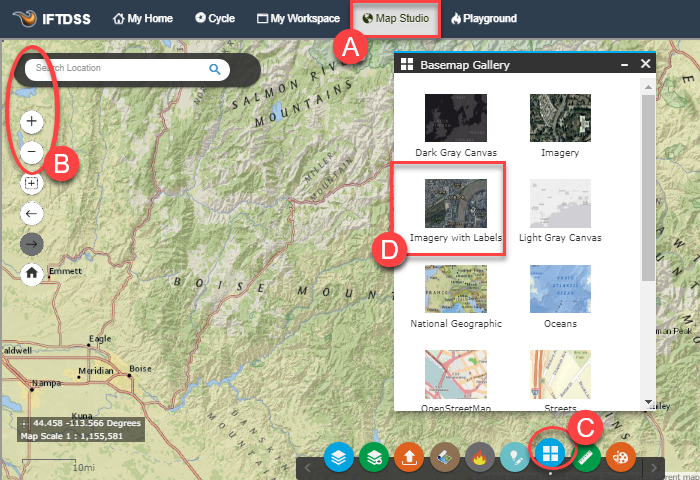
- Open the Basemap Gallery to choose a more detailed basemap.
-
Select "Imagery with Labels" and close the Basemap Gallery widget.
Create the Landscape
The landscape serves as a starting point for the rest of the analysis. To create a landscape:
- Click on the Landscape Tools widget
 at the bottom of the screen.
 - Select the Create New tab to create a new landscape.
- Select Draw Mode, then drag across the area you’d like to analyze. For this example you can follow along by inputting the coordinates below directly into the fields:
- East: -115.5193
- West: -115.8928
- North: 43.9346
- South: 43.7881
- Select a version of LANDFIRE data for the landscape, in this case 2023.
- Select the fire behavior fuel model type (13 or 40), here Fuel Model 40 was chosen.
-
Name the new landscape "Granite Creek LF2023 UnEd." Include the name, LANDFIRE version, and its editing/treatment status. This makes it easy to discern this landscape from others once you start editing.
Important! Try to keep the entire name around 30 characters long to ensure it runs smoothly in future IFTDSS operations.
- Choose or create a new folder for this landscape, this is where the landscape is stored in My Workspace. For this example, use the + button next to the folder name to add a new folder, name it "Granite Creek Treatments."
- (Optional) Add any notes you'd like to include about this landscape. Notes may be viewed in My Workspace by selecting the model run and viewing the right hand metadata panel.
-
Once everything looks good, click Create and wait for the landscape to process. Close the Landscape Tools widget.
