Tutorial: Creating HVRA Sets with Map Values
Map Values is the process of creating an HVRA Set that can be displayed over model outputs, or used as part of Exposure Analysis which is required to run a Quantitative Wildfire Risk Assessment.
-
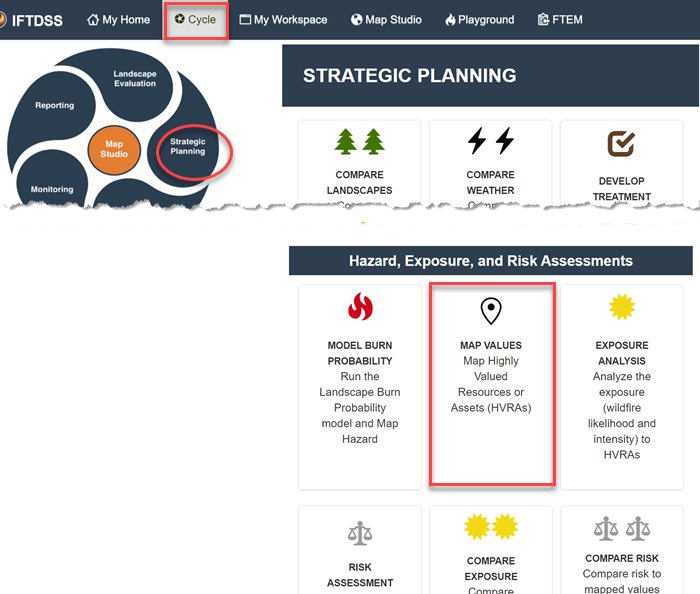
From the Strategic Planning stage of the Planning Cycle, select Map Values.
-
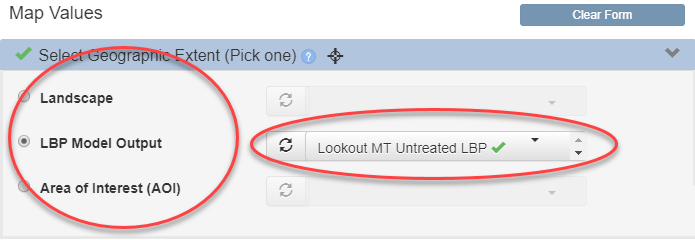
Select your Geographic Extent by choosing the type (Landscape, LBP Model Output, or Area of Interest), and selecting it from the drop-down menu. The Geographic Extent displays on the map, bounded by a black box.
Tip: For Exposure Analysis and Risk. Use an LBP Model Output to set the geographic extent of your mapped values if you intend to use the resulting HVRA Set later for an Exposure Analysis or Risk Assessment. See the Geographic Extent section for more detail.
-
Use the drop-down menu to select a Primary HVRA Category. You may also create your own Primary HVRA category by clicking Create New to the right of the drop-down menu and naming your own.
Tip: For Exposure Analysis and Risk. When identifying which HVRAs to include in your analysis, it is important to limit the list of HVRAs to those of high value. Keeping the scope limited ensures that the interpretation of the results from your analysis remains manageable.

Once a Primary HVRA Category is selected for a given Geographic Extent, IFTDSS automatically generates a list of Sub-HVRAs that intersect that Geographic Extent.
-
Use checkboxes to select one or more Sub-HVRAs.
Data available in the Sub-HVRA picklist is a combination of Reference Data and User Data (shapes and shapefiles) that intersect the selected Geographic Extent. You can filter the data sources by selecting the appropriate tab.

As you select Sub-HVRAs they will display on the map to the left and are listed in the Pending Mapped Values list below. They may be removed anytime by clicking the Delete
 icon to the right, or by unchecking them from the Sub-HVRA list.
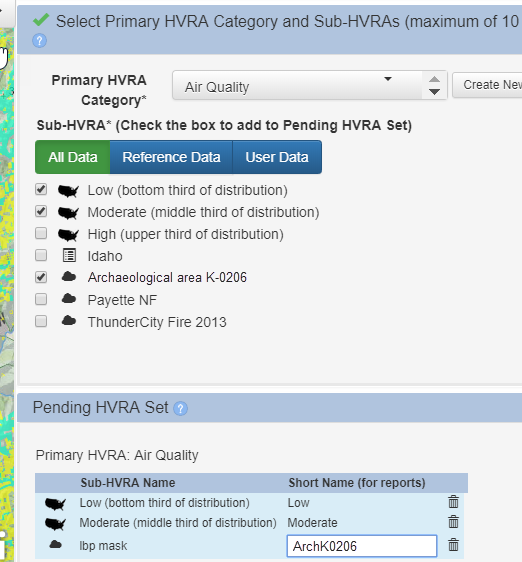
-
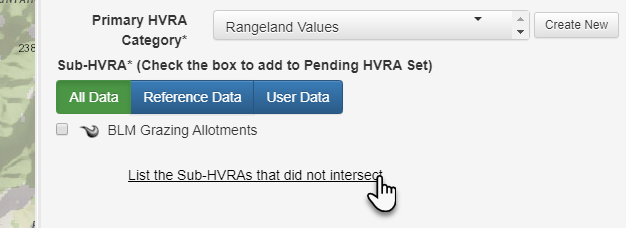
Repeat the above step as many times as needed until you have all your HVRAs. Notice as you add Sub-HVRAs they appear in the map view to the left. Your Geographic Extent may not always include every Sub-HVRA in a Primary HVRA Category. Click the “List the Sub-HVRAs that did not intersect” link to see a list of those.
-
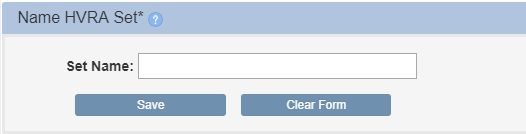
Give the HVRA Set a descriptive name and click Save.
-
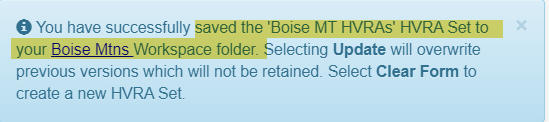
Once saved, a confirmation appears at the bottom of the page. The HVRA Set is available in the same My Workspace folder as the geographic extent you selected at the beginning of the Map Values process.
HVRA Sets can be viewed by either opening them from My Workspace or opening them in Map Studio using the Add Layers ![]() widget.
widget.
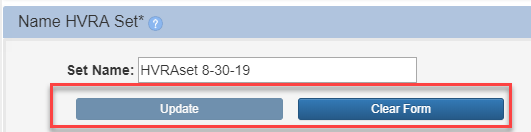
Once saved you see the options to Update, or Clear Form:
-
Update: This lets you make alterations to your HVRA Set and overwrite the previous set. The Update button becomes active when you start making alterations to your HVRAs or HVRA Set name. When finished, click Update to save.
Important! Using Update always overwrites the previous HVRA Set with the updated set, even if you change the name.
-
Clear Form clears all the data from the page so you may create a new HVRA Set. The content you have already saved is retained in My Workspace.
HVRA Set Stored in My Workspace
HVRA Sets are available in My Workspace in the same folder as the landscape, model output, or AOI that defines the Geographic Extent. From there you can:
- View the HVRA Set in Map Studio.
- Make edits to an existing HVRA Set.
- Copy an HVRA Set to create new sets based on that one.
- View the tabular list of the Primary HVRAs and Sub-HVRAs in the set.
-
Delete the HVRA Set.

Note: The Edit and Delete options are not available for HVRA Sets that have been used in an Exposure Analysis. You may still copy an HVRA Set used in an Exposure Analysis and make edits to the copy if needed.
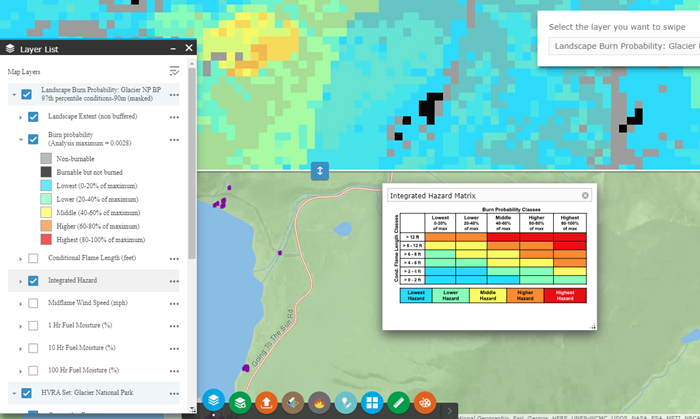
Viewing your HVRA Set with model outputs
To view your HVRA Set overlaid with model outputs in Map Studio, follow the steps below. In this example we’ll add the HVRA Set to Map Studio and then add the model output, but you can perform the process in either order:
- In Map Studio, open Add Layers
 and make sure you are on the My Layers tab.
 -
Set the filter to “HVRA Sets”.
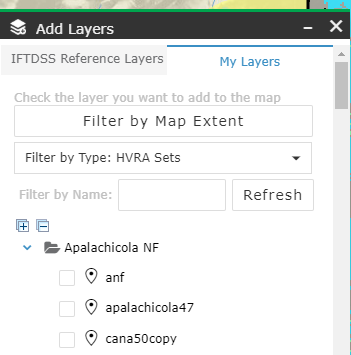
-
Use the checkbox to select your HVRA Set. It will then be visible on the map and listed in the Layer List.
Tip: Do your large Mapped Values appear gray in Map Studio? You may need to zoom in. See the Known Issues topic for more detail.
- Next, add your model output by navigating to the Simulation Output
 widget and selecting the output. You may filter by map extent or model type to make the list of outputs more manageable.
 -
Use the Swipe
 widget to select a layer to swipe and turn on/off layer features.
 Tip: Remember that the Swipe widget automatically uses the top two active features, so you may have to close the swipe widget, turn some layers off in the Layer List, and turn Swipe back on to swipe between the two layers you are most interested in.
You may find a variety of additional ways to use the HVRA Sets in Map Studio. Swiping with model outputs is only one example.
