Developing Treatment Alternatives
Starting the Develop Treatment Alternatives Task
Now that you have a baseline data for the landscape and fire behavior, and specific areas for which you’d like to propose treatments, you’ll move on to the Develop Treatment Alternatives workflow. This task is under the Strategic Planning stage of the Cycle. Here you will develop and compare fuel treatment alternatives so you can determine how changes in the fuels characteristics affect fire behavior outputs.
Start by selecting the Develop Treatment Alternatives task.
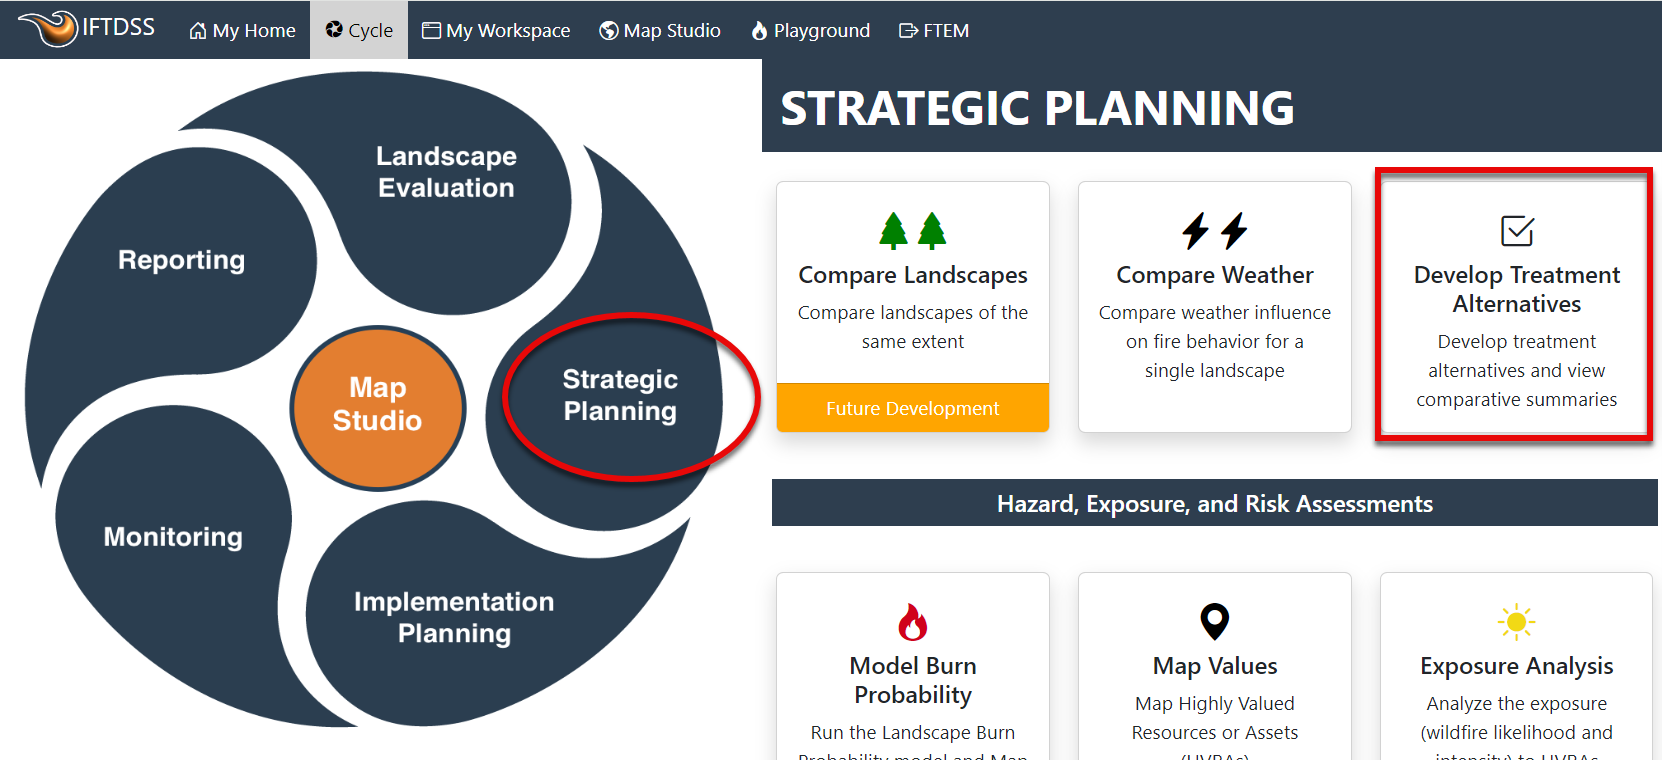
The Develop Treatment Alternatives screen contains five tabs, or steps. You'll proceed through each one using the steps below.
Pick a landscape and area of interest
- Select the "Originating Landscape" (Granite Creek LF2023 UnEd). The Originating landscape sets the landscape extent for the rest of the workflow. Originating landscapes displayed in the dropdown menu will always be un-edited LANDFIRE layers. Any edited layers you've created that match that extent will become available in subsequent tabs.
-
Select the AOI created earlier in Map Studio (Granite Creek Proposed Treatment Areas). This will constrain the analysis to the treatment areas. If Area of Interest was left blank, the analysis would be applied to the entire landscape.
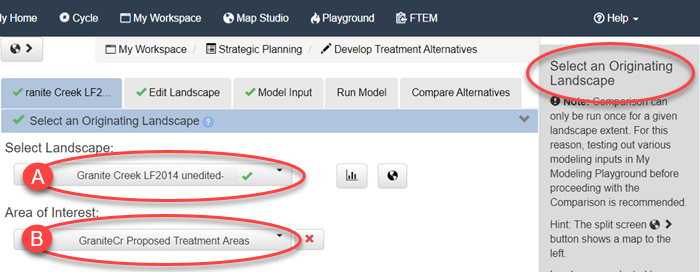
Notice the Right Hand Panel offers information regarding how to use the landscapes correctly in this task. Make it a point to read through these panels for each page, they contain helpful information.
Edit the landscape to simulate treatment scenarios
Next, move to the Edit Landscape tab. In this step a rule set will be created and applied to simulate a thin, followed by a pile burn inside of the treatment areas. Editing landscapes to simulate treatments is a process which varies by landscape. Often fuels staff work with silviculturist to model stand characteristics. The goal of landscape editing is to create a landscape that produces the fire behavior you would expect following the treatment.
This tutorial will proceed with a set of sample rules representing a landscape with fire behavior fuel models that produce less severe fire behavior. They also include a less dense canopy, slightly less canopy cover, and canopy base heights of around five meters.
- Select the "Granite Creek LF2023 UnEd" landscape as your starting landscape. If you'd like to see your selected landscape while editing, click the Split Screen
 button in the top left.
 - Click User Created Edit Rules to display editing options.
-
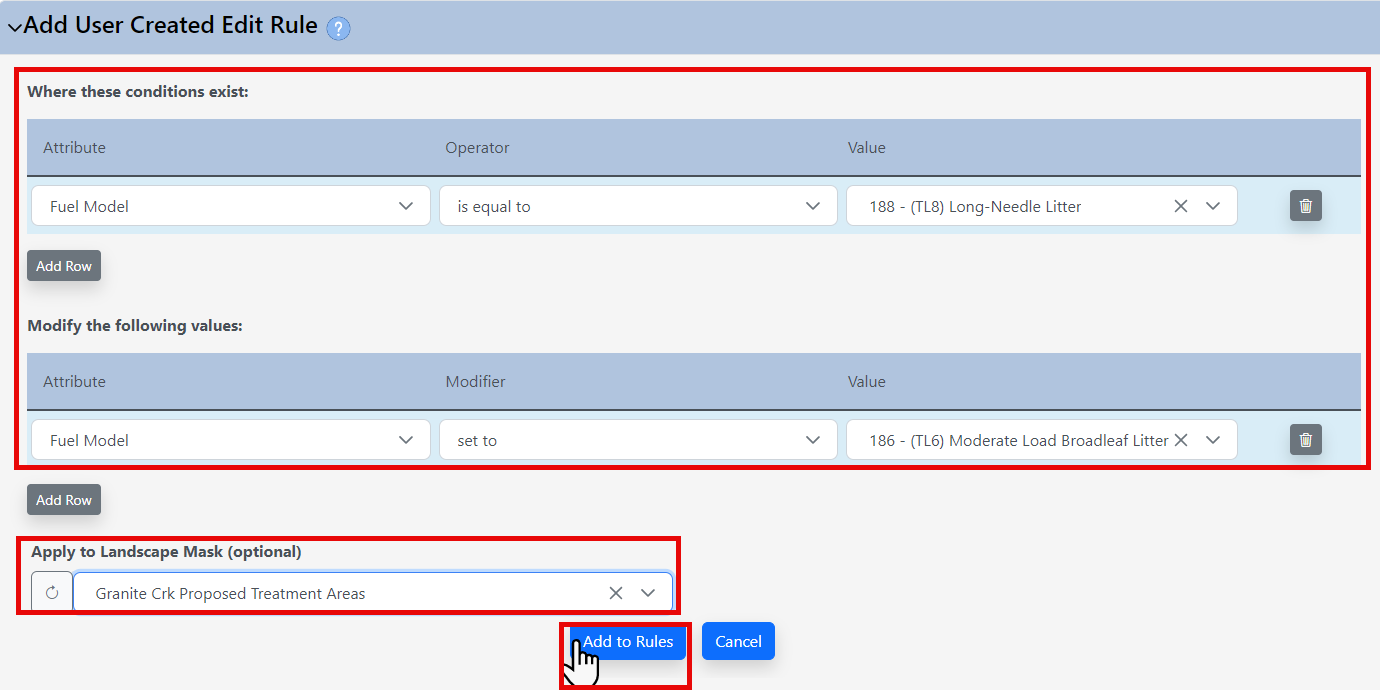
Use the dropdown fields to create your first rule.
-
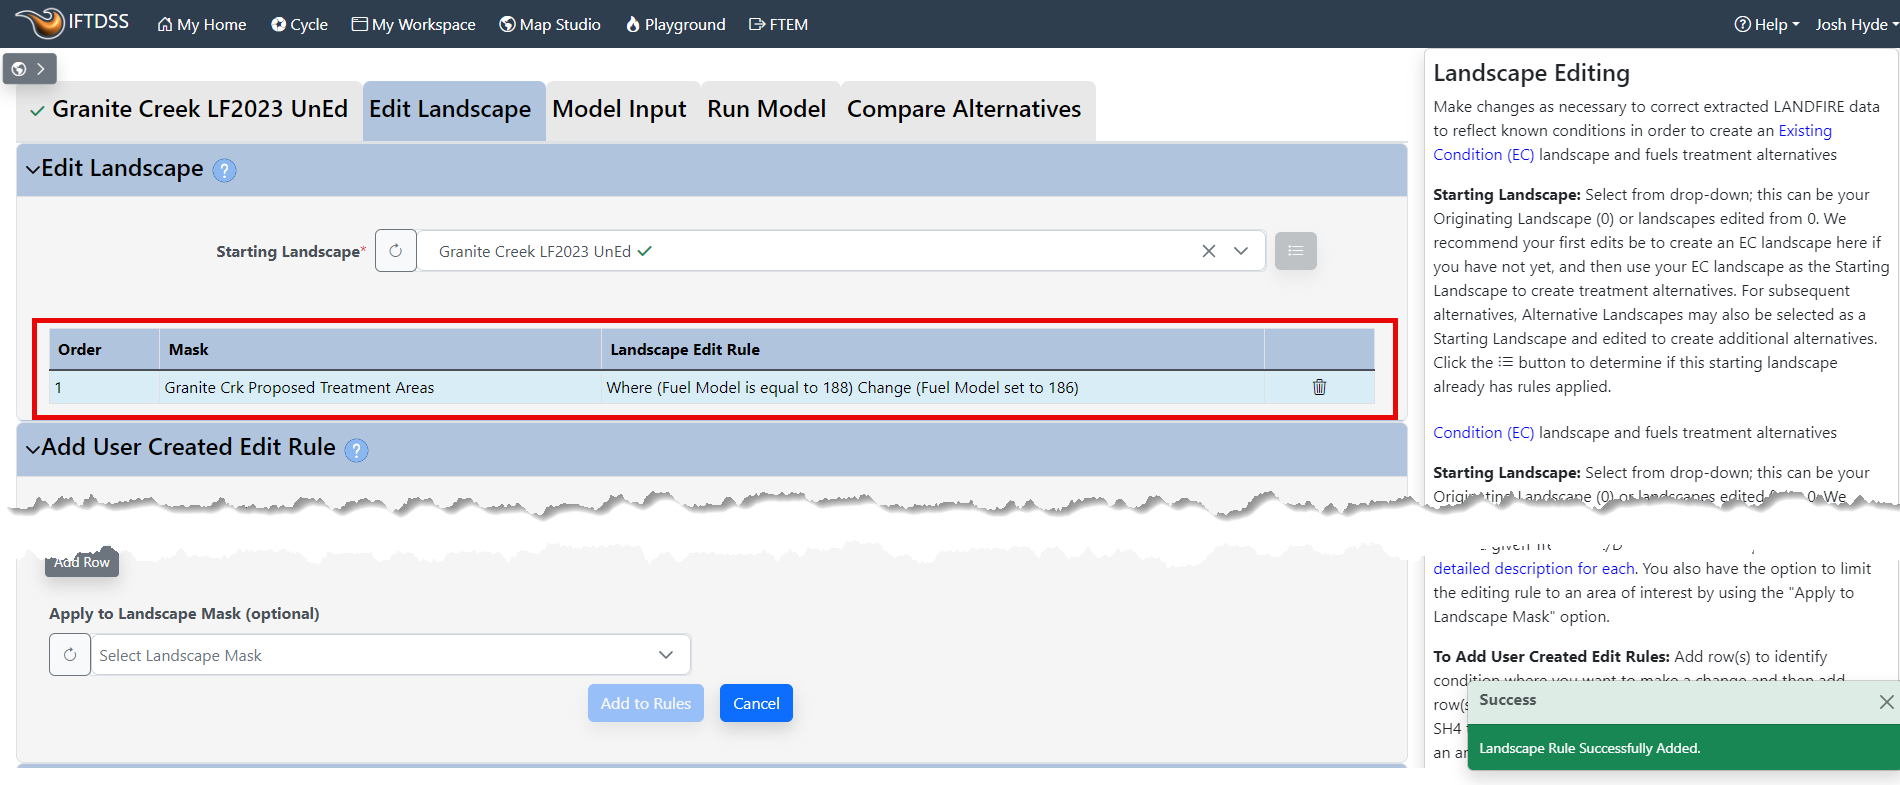
Under "where conditions exist", select "Fuel Model" as the attribute. For "Operator" select "Equal to", and for "Value" select TL8.
-
Under "modify the following values", select "Fuel Model" as the attribute. For "Operator" select "Set to", and for "Value" select TL6.
-
Under "Apply to Landscape Mask", select "Granite Crk Proposed Treatment Areas"
This rule states that where fuel model is TL8, it will be changed to TL6, within the confines of the Granite Crk Proposed Treatment Areas polygon.
Click Add to Rules.
-
-
A green pop-up will confirm this action in the bottom right. Scrolling to the top, we can see this rule has been listed as rule 1.
-
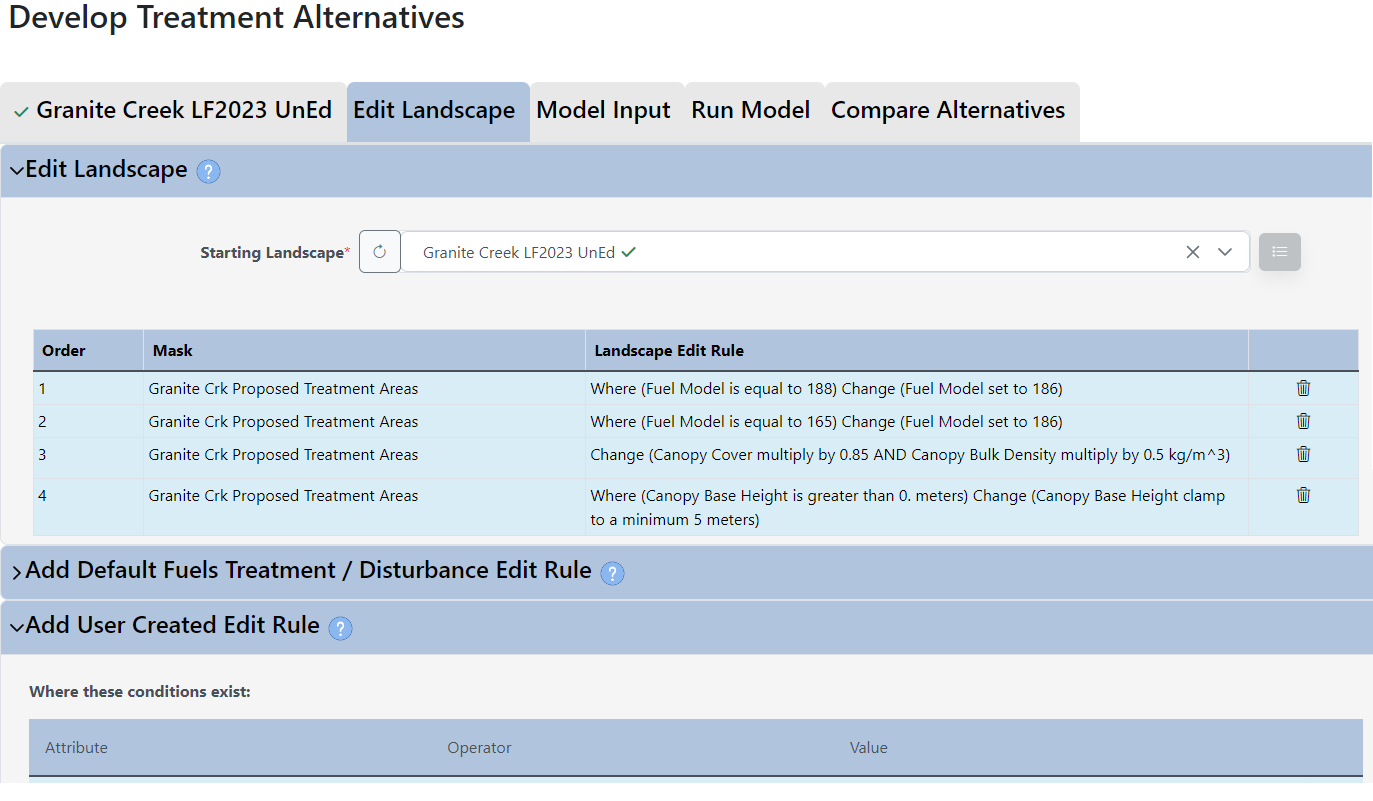
Repeat this process three more times to add the following rules, using the Area of Interest and Add to Rules button to apply each one.
-
Where Fuel Model is equal to TU5, Change Fuel Model set to TL6 inside the Proposed Area of Interest (This sets all TU5 fuel model cells to TL6).
-
Where elevation is greater or equal to 0, multiply Canopy Cover by 0.85. While still in the "Modify the following Values" section, use the Add Row button to add a row and multiply Canopy Bulk Density by 0.5 inside the Proposed Area of Interest. (This reduces the canopy cover by 15% and cuts the canopy bulk density by half. Selecting anywhere with an elevation higher than 0 ensures that all of the cells inside of the area of interest receive this edit).
-
Where Canopy Base Height is greater than 0 meters), clamp Canopy Base Heights to a minimum of at least 5 meters within the proposed area of interest. (Anywhere canopy base heights are over 0, the new minimum height will be 5 meters. Any canopy base heights above five meters are unaffected).
-
-
When all rules are applied, the list at the top of the page should look like the image below.
-
The rules will be implemented in the order in which the rules are numbered.
To finalize and create your edited landscape, scroll to the bottom of the editing page, give the new landscape a descriptive name: "Granite Creek Thin and Pile", and click Save New Landscape.
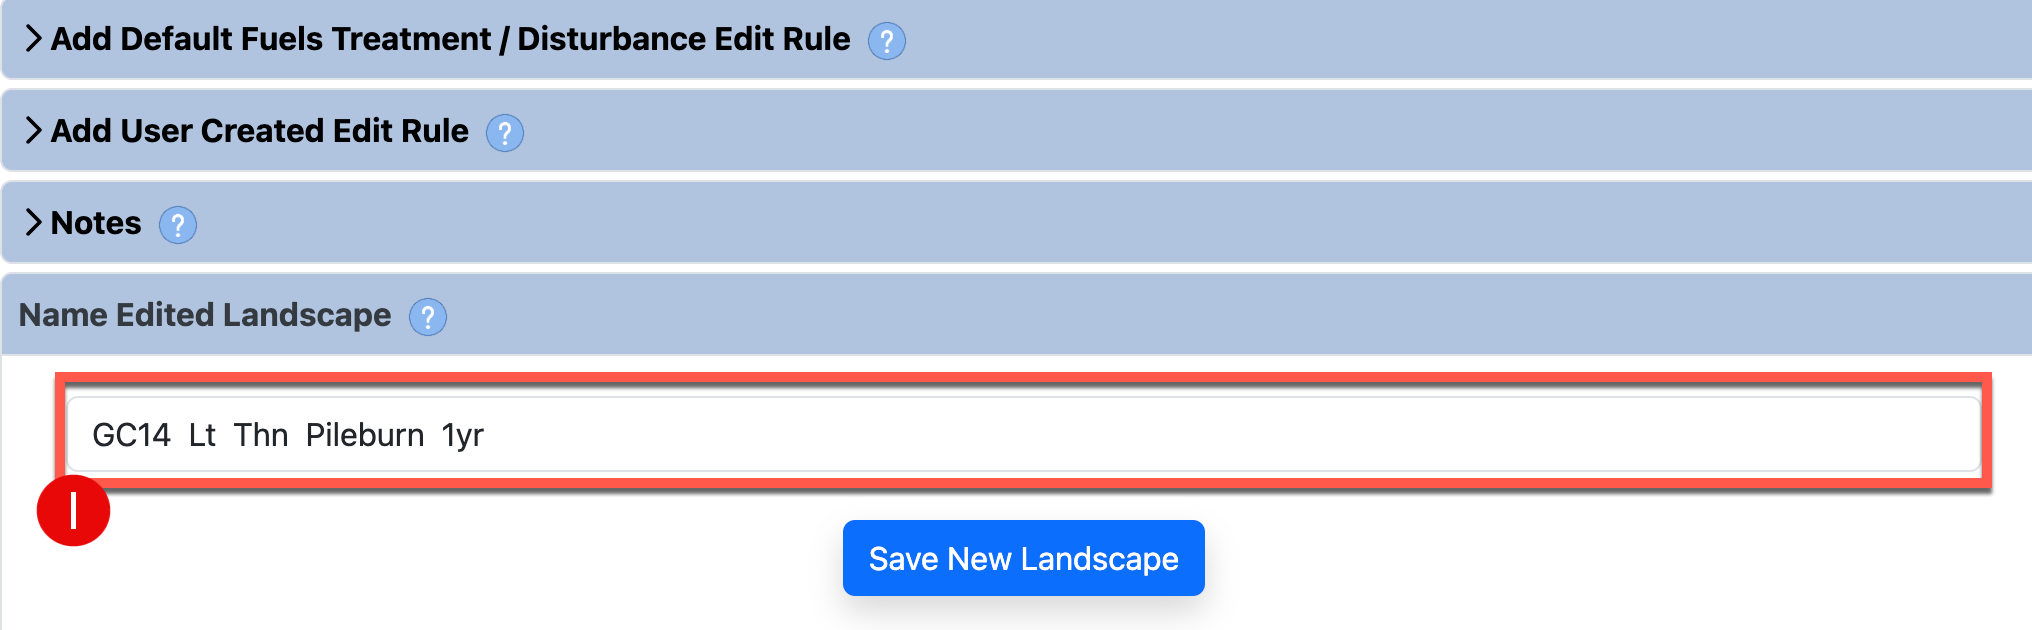
Important! Keep the landscape names around 30 characters in length so they run smoothly through the comparison and reporting process within IFTDSS.
Proceed to the Model Input tab.
Enter parameters for a fire behavior modeling scenario
In the Modeling Input tab, you'll use 97th percentile weather and fuel moisture inputs that were supplied in the PDF report you downloaded earlier. Open the PDF copy of the Auto97th report and scroll until you find Crown fire output map, values will be displayed in the bottom right of the map box. If you did not save a PDF copy, you could also obtain this information by accessing my Auto97th report in My Workspace, but with a PDF, you don't have to navigate back to this point in the treatment alternatives task.
- Enter the inputs for wind, crown fire inputs, and initial fuel moisture.
- By not clicking + add row under the "Initial Fuel Moisture" section, the fuel moistures will remain the same for all fuel models across the landscape. If you had clicked + add row, you could enter specific fuel models and assign unique moisture conditions for each one.
- For fuel moisture conditioning, select the radio button for Condition (Select Classified Weather Stream) and then select "Extreme" as your weather stream.
-
Click Save Inputs at the bottom of the screen and move to the Run Model tab.

Running Fire Behavior
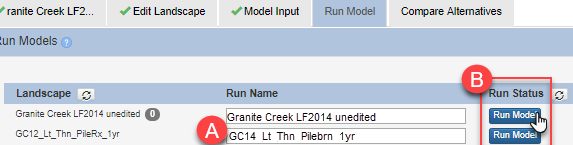
You'll want to run the fire behavior model on both of these landscapes here so you can compare the results:
- Examine the names next to each of the landscapes. If you wanted, you could rename them here, but leave them as-is for this tutorial.
-
Click Run Model next to each landscape.
-
Give the models a couple minutes to run. Click the Refresh button to the left above "Landscape" to see the model status, until both are completed.

Next, move to the Compare Alternatives tab.
Compare Alternatives
Once on the Compare Alternatives tab, you'll select each landscape you want to compare. They will be numbered in the order you select them, and from reading the right hand panel information, you'll see that this order is very important:
-
First, select the edited landscape so it has a "1" next to it. Then, select the original landscape, so it has a “2” next to it.
This order tells IFTDSS to calculate the difference created by your treated landscape (1) on your original landscape (2). For example, if your new landscape has flame lengths of 3 feet, and the original has flame lengths of 7 feet, the difference will be: 3 - 7 = - 4. Or in other words, a 4-foot reduction in flame length resulting from the treatment.
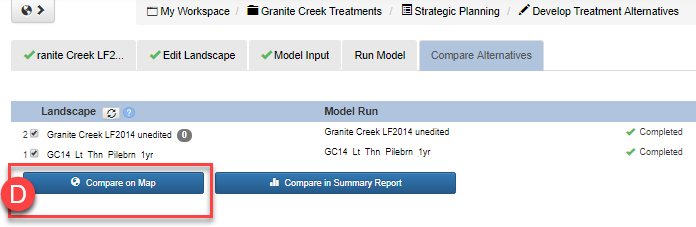
- Now you'll want to view comparison outputs on the map and as a report. First, click the Compare Landscape in Summary Report button.
-
Click Create Report. While the report builds, click Close to close this box.

-
Repeat the process for the Compare Landscape Fire Behavior (Basic) in Summary Report button, selecting Create Report, and closing the box while the report builds.
-
While the reports are building, we can view the results geospatailly by clicking Compare on Map.