Get Started: Shapefiles and Shapes
Introduction
Shapefiles and shapes are created or uploaded in Map Studio and are then made available throughout IFTDSS whenever a mask or area of interest is required.
Note: Shapefile vs. Shape?
"Shapefiles" include both the geometric area, as well as accompanying data, these can be uploaded to IFTDSS from your local machine, and are usually created in ArcMap and similar tools.
"Shapes" include only the geometric area, no associated data. These are created in Map Studio either by drawing or copying with Create / Edit Shapes.
Both shapes and shapefiles may be used as masks and areas of interest throughout IFTDSS
How to Create Shapes in IFTDSS
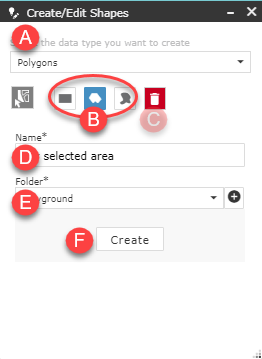
This example will describe the creation of polygons, you may also create lines and points. To create a shape, go to Map Studio and click the Create/Edit Shapes widget ![]() .
.
- Make sure "Polygon" is selected from the dropdown menu.
-
Select your drawing method and draw your shape.
- Drag a Rectangle: To drag a rectangular extent, click the Extent
 button. On the map hold down the left mouse button to establish the corner of your rectangle and drag until it is the required size, then release the left mouse button. Repeat if needed.
 - Snap Points: To snap a polygon using points, click the Polygon
 button. On the map single left click to create your first point. Add as many points as needed, then double left click to complete the polygon. Repeat if needed.
 - Draw Freehand: To draw a polygon freehand, click the Freehand
 button. On the map hold down the left mouse button, draw your shape, and release the left mouse button when finished. Repeat if needed.
- Drag a Rectangle: To drag a rectangular extent, click the Extent
- (Optional) Use the Clear
 button to delete your drawing and start over.
 - Name your shape.
- Select a save folder from the dropdown menu or use the Add folder
 button to create a new folder in which to save.
 -
Click Create to save the shape and add it to the map.
How to Upload Shapefiles
Important! Shapefiles are added to Map Studio as .zip files. The .zip file must contain the .shp, .shx, .dbf, and .prj files that comprise the shapefile.
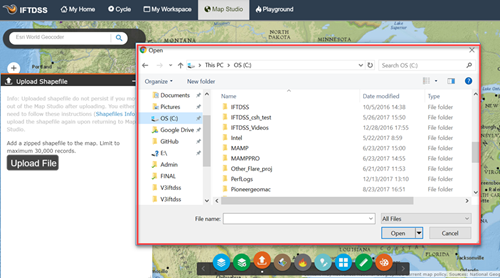
- Click the Upload Shapefile widget
 along the bottom of Map Studio to open the widget.
 -
Click Upload File. A browser box will open allowing you to search your local files. Select the desired shapefile. Shapefiles must be zipped to be uploaded and contain .shp, .shx, .dbf., and .prj files.
Note: Large or complex shapefiles may take longer to load as IFTDSS reprojects the file and repairs geometery if needed.
Tip: You can cancel the upload, if needed, at anytime by clicking the Cancel button.
-
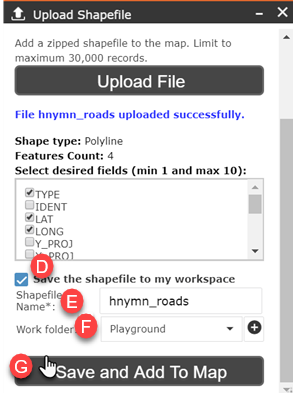
Use the checkbox to select the attributes you wish to import. You may choose up to 10.
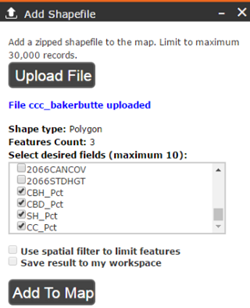
- The "Save" option is checked by default. If you do not want to save this shapefile to your Workspace for later use, uncheck this option.
- Give the shapefile a descriptive name.
- Specify the folder in which to store the shapefile.
-
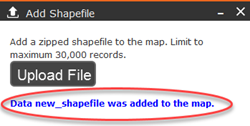
Click Save and Add to Map.
-
When completed, a confirmation message will appear to verify the shapefile has been uploaded.
Additional Information
About Shapes and Shapefiles: Main help topic about shapes and shapefiles.
Copy and Save a Shape from Another Source in IFTDSS:Step by step walk-through on copying and saving a shape from other sources.
Creating Buffers to evaluate areas outside of a burn unit: Steps through two different ways you can create a buffer that surrounds a burn unit. This buffer can be used in a mask or area of interest in summary reports to get information about fuels and fire behavior outside of a burn unit.
Creating Treatment Groups from a subset of Shapefiles: Step by step walk-through on creating a subset of shapefiles from a larger shapefile.
Creating Treatment Groups with Shapes: Step by step walk-through on creating treatment groups with shapes.
How to Edit or Repair Uploaded Shapefiles: Step by step walk-through on editing and repairing shapes and shapefiles in IFTDSS.
