Tip: In IFTDSS, Landscape Fire Behavior and Landscape Fire Behavior (Basic) are used interchangeability to describe the same model.
Landscape Fire Behavior in IFTDSS is identical to the Basic Fire Behavior (BFB) tool in WFDSS.
See the Fire Behavior Model Comparison topic for a discussion of landscape fire behavior model differences between IFTDSS and WFDSS.
Select the Model
To run Landscape Fire Behavior from My Modeling Playground, open Select Model to Run in the top left, select Landscape Fire Behavior from the dropdown menu, and click Create Run.
Populate the Model Inputs
-
Choose a landscape for your run from the dropdown list. If you have not created a landscape, you may use the Create New Landscape
 button to the right to either create a landscape or upload an existing landscape.
-
Choose whether to manually enter weather and fuel moisture values for the model, generate values using the closest weather station to your landscape, or pick a specific weather station from which to generate values. Any values applied in this step can still be edited or replaced.
See the Fire Environment Mapping System (FEMS) weather topic to learn more about each method.

-
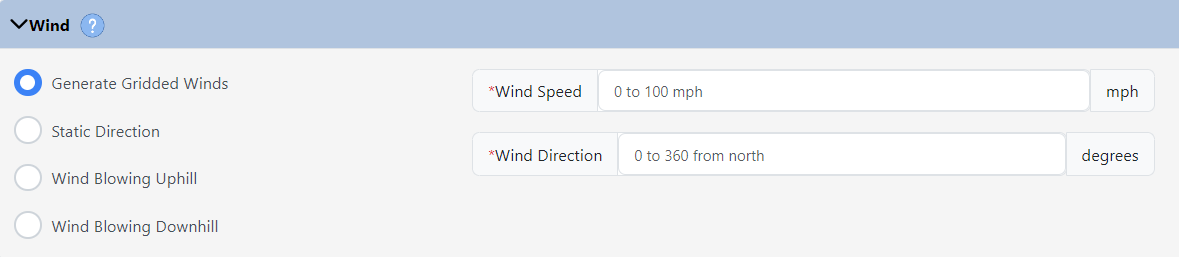
Select a wind option, gridded is the default and best for complex terrain. Other options include static (one direction across the entire landscape), winds blowing uphill, or winds blowing downhill.
Specify windspeed in miles per hour, 20 feet above the ground or above the vegetation. Enter wind direction as the direction the wind is blowing from (in degrees clockwise from north, with north being 0 or 360 degrees).
-
Specify a crown fire calculation method from the dropdown menu, and specify the foliar moisture content (in percent).

-
Specify initial fuel moisture, in percent, for:
- 1 hour fuels (1hr FM) - allowed values 2-40
- 10 hour fuels (10hr FM) - allowed values 2-40
- 100 hour fuels (100hr FM) - allowed values 2-40
- Herbaceous fuels (Herb FM) - allowed values 30-300
-
Live Woody fuels (WoodyFM) - allowed values 60-300
If you choose to only populate one row, those fuel moistures will be applied to all fuel models in your landscape.
(Optional) If you would like to specify differing fuel moisture values for individual fuel models, click + add row. This will add a new line. Using the dropdown list, choose a fuel model then specify the fuel moisture values for that model. You may repeat this for as many individual fuel models as needed.

For more guidance on choosing fuel moistures see the Estimating Fuel Moistures topic.
-
Select a Fuel Moisture Conditioning method. If you choose not to condition, your initial fuel moistures from the previous step will be used throughout the landscape.
If you choose to condition your fuels to account for landscape features and weather, use one of the conditioning options below:
-
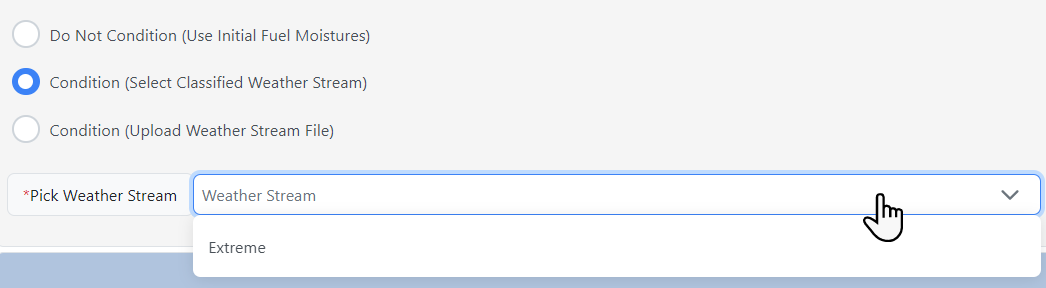
Condition (Select a Classified Weather Stream): Uses an automatically generated weather stream for extreme conditions (based on static pyrome data). Currently Extreme is the only option available in the dropdown menu.
-
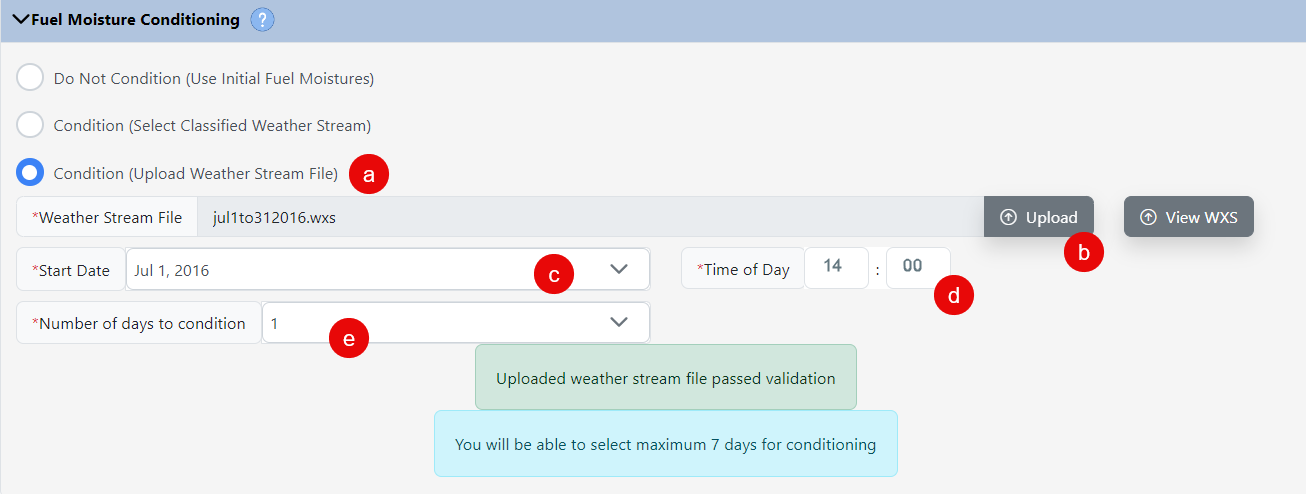
Condition (Upload Weather Stream File): Conditions based upon a weather stream file you upload, following the steps below:
- Click the Condition (Select Classified Weather Stream) button.
- Click the Upload button and select a .wxs file from your local machine.
- Select a start date from the dropdown menu on which the conditioning period begins.
- Enter a time (in 24 hour hhmm format) on which to start and end conditioning.
-
From the Number of days to condition dropdown menu, select a period for fuel conditioning, up to 7 days.
View the WXS topic for instructions on creating a .wxs file.
-
Condition (FEMS Weather Stream): This option uses a FEMS weather stream and is available if you selected a Weather Station in previous steps. This selection conditions based on your selected weather station, a specified start date and time, and number of days to condition (up to seven).

-
-
(Optional) Add any notes you'd like to include about this run. Notes may be viewed in My Workspace by selecting the model run and viewing the right hand metadata panel.

-
Give your run a descriptive name.
-
(Optional) If you choose to save your inputs and complete and run at a later time, click Save. The Update button will appear. You may then choose to navigate to another part of IFTDSS, or click the Update button to resume editing. If you choose to navigate away and return at a later time, you may select the model in modeling playground and click the Edit option to resume your work.
-
Click Run to begin the model run. Once run, your model output will be available in My Modeling Playground and My Workspace.

Important! A maximum of five Landscape Fire Behavior runs may be submitted at any given time. If you see a pop-up notifying you that this number has been exceeded, please save any inputs you’ve entered and complete your task when one of the other runs has completed.
Model Completion
Once completed, Landscape Fire Behavior run outputs are available to be viewed in Map Studio using the Simulation Output Tools widget  and clicking the model name from the list of completed model runs. You may also do this from My Modeling Playground and My Workspace by clicking on your file and selecting the View on Map option.
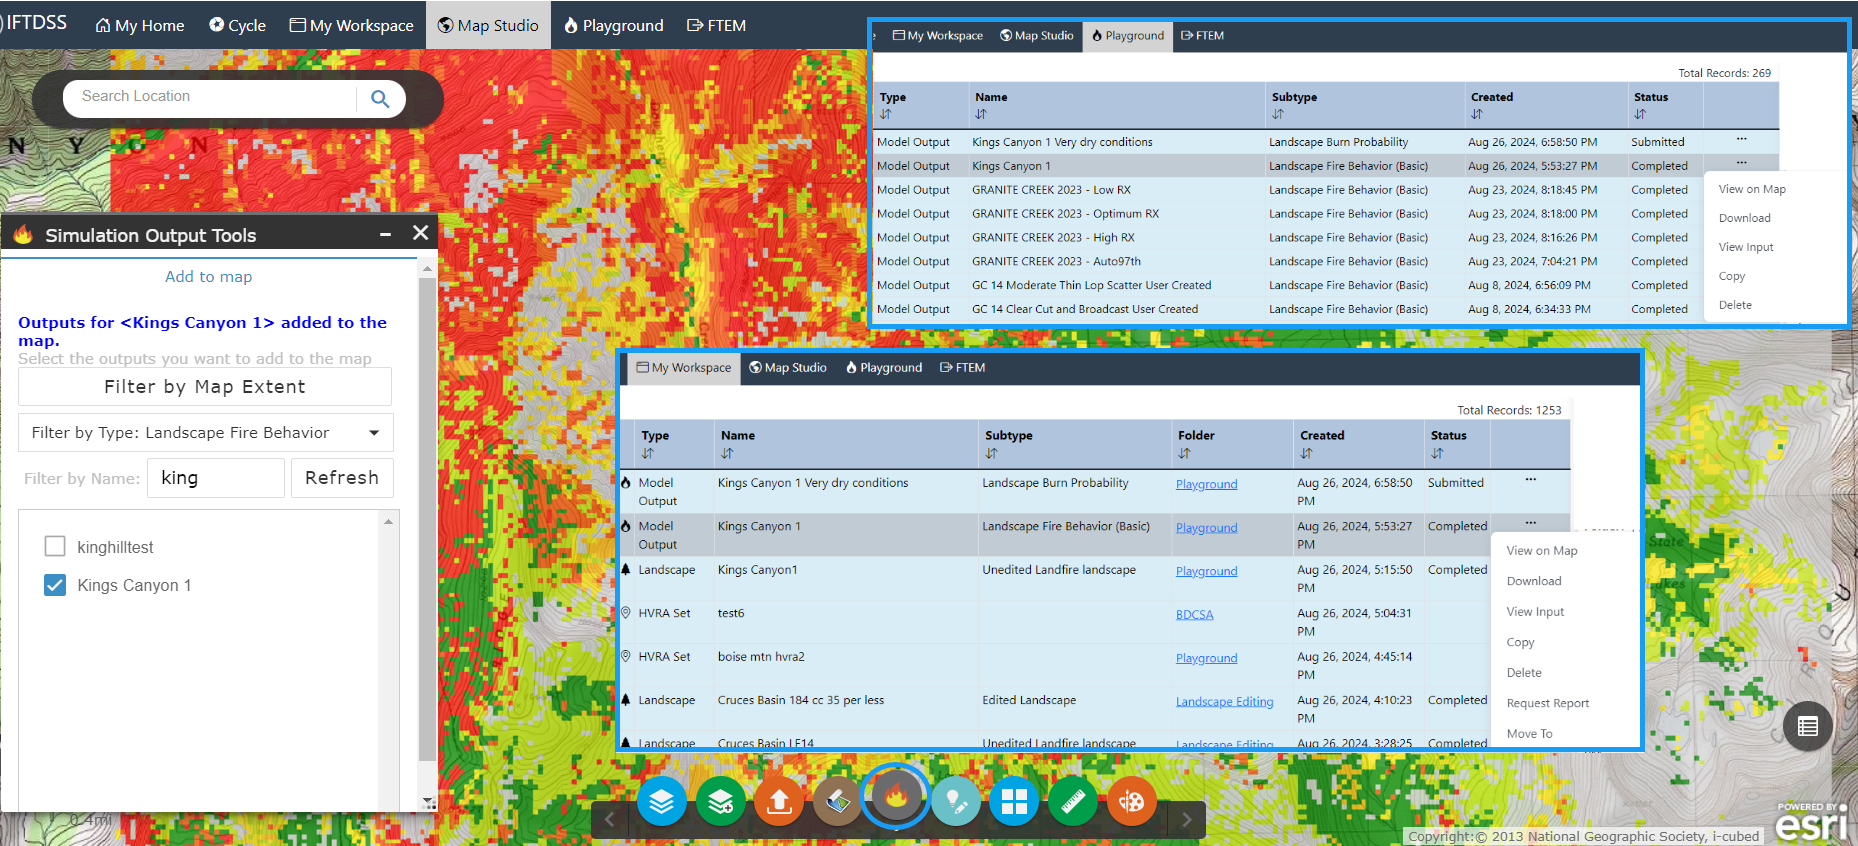
Tip: All saved runs are stored in the same folder as your selected landscape, or in the "Playground folder" if a new landscape is created but no folder specified.
To see how to generate an Automatic 97th Percentile Landscape Fire Behavior (Auto97th) Report for your landscape, visit Automatic 97th Percentile Landscape Fire Behavior (Auto97th) Report Documentation.
Model Outputs
Model Outputs for LandLandscape Fire Behavior reflect fire behavior under the assumption that every burnable pixel on the landscape burns. These outputs, their units, and links to in-depth descriptions are listed below.
| Output | Brief Description |
Map Studio Units |
Report Units | Download Units |
|---|---|---|---|---|
| Flame Length | The flame length of a spreading surface fire within the flaming front is measured from midway in the active flaming combustion zone to the average tip of the flames. | feet | feet | meters |
| Rate of Spread | The relative activity of a fire in extending its horizontal dimensions. It is expressed as rate of forward spread of the fire front. | chains/hr | chains/hr | meters/min |
| Fireline Intensity | The heat energy released per unit time from a one-foot-wide (or one-meter-wide) section of the fuel bed extending from the front to the rear of the flaming zone. | BTU/ft-sec | BTU/ft-sec | kW/m |
| Heat per Unit Area | Heat energy release per unit area (square foot or square meter) within the flaming front of the surface fuel. | BTU/ft2 | BTU/ft2 | kJ/m2 |
| Crown Fire Activity | Fire activity in the forest or shrub canopy. Characterized as surface fire, passive crown fire (torching), or active crown fire. | class | class | class |
| Midflame Wind Speed | Wind velocity at the midflame height. Calculated using wind adjustment factors based on stand height and canopy cover and the Wind Speed. | mph | N/A | mph |
| Horizontal Movement Rate | The rate of fire spread (slope basis), transformed to a horizontal projection. | N/A | N/A | meters/min |
| Maximum Spread Direction | Direction of maximum spread in degrees. | degrees | N/A | degrees |
| Maximum Spot Direction | Direction of maximum spotting, the direction the spot was lofted from, NOT the direction the spot is coming from. | N/A | N/A | degrees |
| Maximum Spot Distance | Maximum spot distance in meters. | N/A | N/A | meters |
| Crown Fraction BurnedA | A fraction between 0 and 1 indicating the severity of a crown fire. 0.0 indicates a surface fire while 1.0 represents an active crown fire. Intermediate values represent a scaled value of passive crown fire severity. | N/A | N/A | proportion |
| 20 Ft Wind Direction B | Wind direction is the direction from which the wind is blowing, specified in degrees increasing clockwise from north (which is zero degrees), Uphill or Downhill. | N/A | N/A | degrees |
| 20 Ft Wind Speed | Wind velocity measured 20 feet (6 m) above the top of the tree or shrub canopy, or above the ground if canopy is absent. | N/A | N/A | mph |
| Solar Radiation | The solar radiation of each cell for the ending time of the optional fuel moisture conditioning period, only available when fuel conditioning was used. | N/A | N/A | W/m2 |
| 1-hr Fuel Moisture A | Moisture content of 1-hour fuel (dead woody fuel 0 to ¼ inch or 0 to 6.4 mm in diameter) is the mass of water within the fuel particle expressed as a percentage of the fuel particle’s oven-dry mass. | proportion | N/A | proportion |
| 10-hr Fuel Moisture A | Moisture content of 10-hour fuel (dead woody fuel ¼ to 1 inch or 0.6 to 2.5 cm in diameter) is the mass of water within the fuel particle expressed as a percentage of the fuel particle’s oven-dry mass. | proportion | N/A | proportion |
| 100-hr Fuel Moisture A | Moisture content of 100-hour fuel (dead woody fuel 1 to 3 inches or 2.5 to 7.6 cm in diameter) is the mass of water within the fuel particle expressed as a percentage of the fuel particle’s oven-dry mass. | proportion | N/A | proportion |
| 1000-hr Fuel Moisture A,C | Moisture content of 1000-hour fuel (dead woody fuel over 3 inches or 7.6 cm in diameter) is the mass of water within the fuel particle expressed as a percentage of the fuel particle’s oven-dry mass. | N/A | N/A | proportion |
A GeoTIFF values for non-burnable pixels are 0.000000 unless the GeoTIFF download was request prior to 6/24/19.
B If Uphill or Downhill wind direction was selected during the model run, the wind direction will be displayed on the GeoTIFF raster grid as -1 for uphill winds, -2 for downhill winds.
C 1000 Hour fuel moisture will always be equal to 100 Hour fuel moisture in the GeoTIFF download.
Creating a Landscape Fire Behavior summary report for an Area of Interest
Once you have created a Landscape Fire Behavior modeling run, you have the option of creating a summary report from My Workspace. Summary reports present your data in graphs and tables that may be easily copied over into your own planning documents and reports.
The steps below outline how to do this for a specific area of interest. However, if you wanted to generate a report for the entire landscape you may do so by simply leaving the AOI field in the steps below blank.
-
From My Workspace, right click the landscape or model output file and select Request Report from the dropdown menu. A report dialogue box will open.
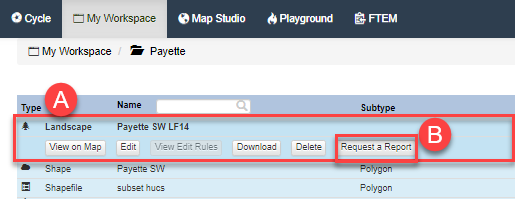
- (Optional) Specify an area of interest to constrain the report. If you leave this blank, the report summarizes the extent of the entire landscape or output.
-
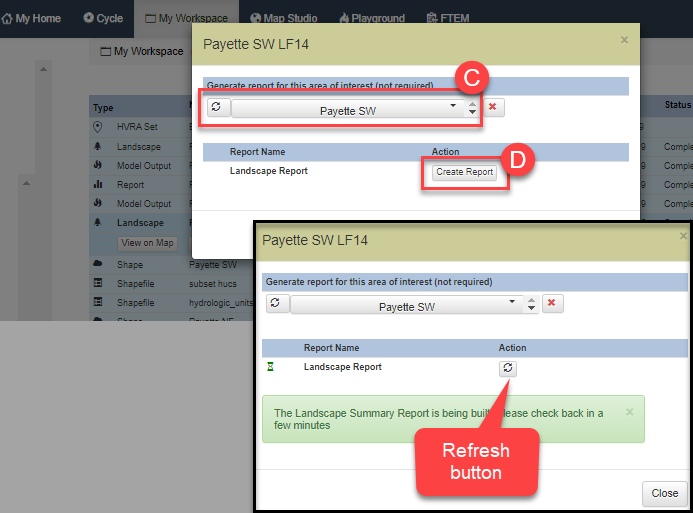
Click Create Report. You may use the refresh button to check whether your report is ready. Reports may take several minutes to generate depending on file size.
-
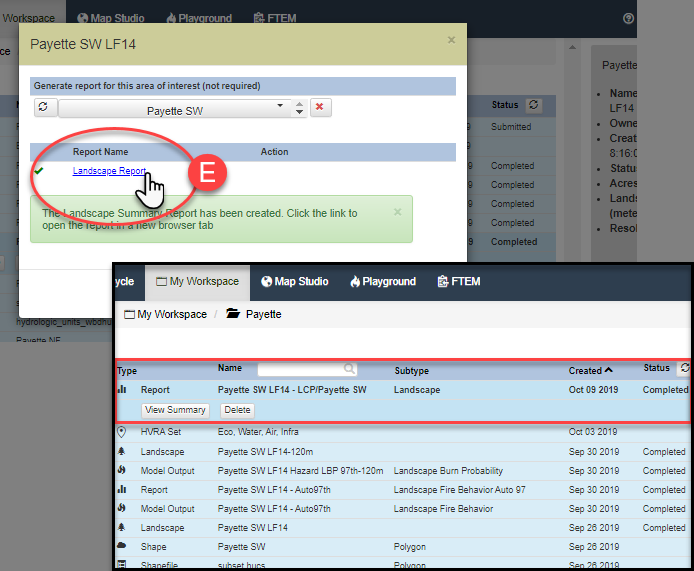
When ready, the Refresh button will turn into a View Report button. The report will also be visible in My Workspace, stored in the same folder as the file it summarizes. Clicking the View Report button, or View Summary button in My Workspace will open the report in a new tab.